How to Make Care Freshies
Check out this post How to Make Care Freshies Yourself! If you've seen these highly scented and beautiful car air fresheners, you can see how to make these yourself! Great for gifts!

How to Make Care Freshies
We heard about Care Freshies a while back. These are cute air fresheners that take the scent of oil from the scented oil and sticks sets you see.
Just hang from your rear-view mirror or a window in the house, and it becomes an instant freshener and a suncatcher! The light catches these pretty beads and you have something so much better than those typical cardboard or candle shaped ones that you find at the store.

This DIY does take some time and patience, so stick with me on the How-To instructions. If you get through this post and are thinking it's not exactly what I want to do– way too much work– then you can head over and purchase these readily made!
My daughter Taylor is now selling these finished Care Freshies over at her TaylorMaydeCreations Facebook Page.
DIY Instructions for Care Freshies:
If you're ready to get started on these yourself, here you go! First, start with a good set of metal cookie cutters. I recommend metal since we need something sturdy for the beads.
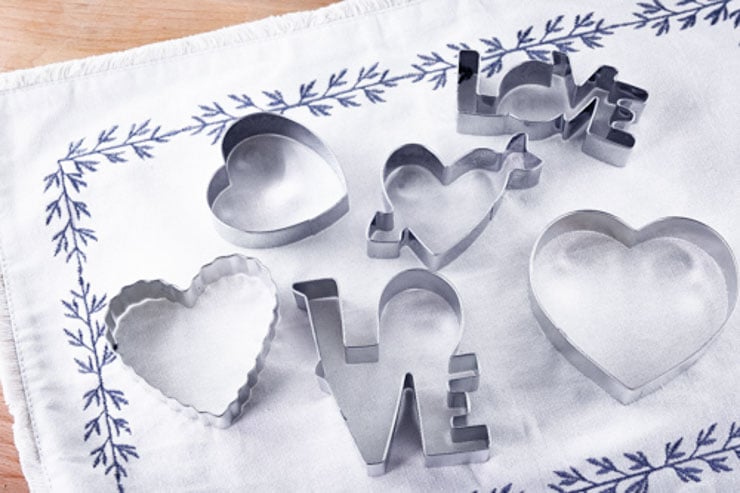
We used Valentine's themed cookie cutters, since this is the time of year we made them. Use any cookie cutters you prefer. Generic ones like flowers will work for any time of year. Just remember that smaller cookie cutters or X-large cookie cutters may not work as well. You will need to play around with the designs.

Next, you will need to have Aroma Beads which have been soaked with Fragrance Oil.
The soaking part of this DIY is what takes the longest. 2-3 weeks prior to your project, you will need to add the Aroma Beads along with your Fragrance Oil to a clean mason jar. Close the lid tightly and turn the jar upside down often, each day. You can also shake the jar to speed up the process. (See Printable Instructions below). You can find fragrance oil in craft stores, and go with any scent you prefer!
After the beads are no longer sticky, they are ready to go in the cookie cutters and you can finish your project.

Baking and Assembling Care Freshies:
In this picture we used our fully prepared aroma beads. We prepared a cookie sheet with parchment and set the cookie cutter down flat on the paper. Then, using a large nail with a good-sized nail head to keep it upright, poured the beads around it. The beads also help hold up the nail.
A clean nail worked well to keep a hole in the Care Freshie for the string. Don't forget this step– you can really mess up your finished project if you are trying to poke a hole into it after it is done. 🙂

Adding Mica Powder for Color:
This is the fun part of this project! You don't want all the beads a bland color, so for this we used Mica Powder in different colors. You can find these packets on Amazon.

Just mix in the Mica powder until the beads are coated. Shake a very small amount out, being careful not to add too much.
The Mica Powder can keep them from sticking if you add too much! If you're wondering what Mica powder is, you might have to think back to grade school. Mica is a non-toxic natural mineral. It's not ingestible, of course, but it's ideal for craft projects since it can add colorful, shiny finishes to soaps, clay, and many other types of art. Mica powders and flakes reflect light, which is one reason it's great for this project. Observe any safety precautions on the packaging (probably minimal). Do keep away from children and pets as it may be mistaken for something edible.

Finishing Touches:
After they are done, all you do is pop out (carefully) and let cool. The nail may come out of the cookie cutter along with the freshie. Carefully back out the nail, using work gloves if needed.

Run a fun ribbon through the top to hang from your mirror in your car, or even around the house! If you want to make it even more special you could even use a custom lanyard for gift giving. You can buy sealable cookie bags to package these for gifts. They make great teacher or healthcare worker appreciation gifts, or something to tuck in a gift basket for Valentine's Day!
These turned out so adorable, we will be making more in the future. I am excited to try new colors and shapes, and of course see more at Taylor's online store. Click below for your printable instructions.

- Apple Watch Series 11 Deal: Save $100 on the Latest Apple Watch at Target
- Simzlife Bread Maker Deal: Save 67% on This 25-in-1 Machine at Target
- Fuzzy Slippers Deal: Cozy Memory Foam Slippers 51% Off
- Air Fryer Oven Deal: Save 50% on a 10-in-1 Countertop Oven
- Gap Factory Sale: Save 50% Off Sitewide Plus 60% Off Back-to-Class Essentials
Print Below: How to Make Care Freshies
DIY Care Freshies
These Care Freshies will keep your car smelling amazing! You can make these yourself in any cookie cutter form. We used Hearts for Valentine's Day!
Materials
- Aroma beads
- Fragrance oil
- Mica powder
Tools
- Mason jar
- Cookie cutter
- Scale
- Non stick pan
- Large Nail
Instructions
Directions:
Add 1oz of oil per 4oz aroma beads to mason jar.
Seal tightly and shake to distribute the oil. They need to sit until oil is fully dissolved. This can take up to several weeks depending on the scent.
Make sure to rotate the mason jar from the upright to upside down position throughout the day and shake it to distribute the oils. Once dry (they will not stick to the jar) they are ready to be used.
To make:
Preheat oven to 350 degrees and bake for 5 to 8 minutes.
Pick your cookie cutter of choice and set it on a piece of paper.
Fill cookie cutter 3/4 the way full and then pour into a bowl. Add mica powder color of choice. Mix till covered.
Too much mica powder can cause them not to stick. A little goes along way.
Put a nail at the top to create a hole.
Add colored beads back to the cookie cutter on a nonstick pan and bake. Let cool then punch out your freshie and decorate as desired!
Notes
This is not a children's activity or craft; beads may pose a chocking hazard to young children, and may be mistaken as candy.
Keep all items and finished car freshie out of reach of children!


Where does one get the aroma heads?
You can get them here https://amzn.to/2M4Jwso
Does the smell of the oils linger in your oven and get into the foods you bake? Would it be best to buy a used toaster oven?
Hi Lisa, the smell may linger for a short time but shouldn’t get into the foods you bake. 🙂
Where is the best place to buy scents
Hi Cynthia, we usually get our fragrance oils from Amazon but you can find them at craft stores. There should be a link in the post to the Amazon fragrance beads and oils. Hope this helps 🙂
Aww thank you so much for doing this demo for us all to see just how this is done I have been wanting to make these for well over a year now .❤️
You’re so welcome Stacy – send us a picture of the ones you make!
Does it matter what size cookie cutter you use? How do you know what size cookie cutter to get?
Hi Jeannie, regular sized or smaller cookies cutter are what you need. Just make sure they’re metal ones. Hope this helps 🙂
Does it matter what size cookie cutter you use?
Hi Jeannie,
You can use any size cutter you want 🙂
Just curious, why can’t you use silicone cookie cutters?
Hi Penny,
The silicone cookie cutters may not be strong or sharp enough to cut them out. You can try them and see – let us know how they worked out if you do 🙂
I just made my first batch of car freshies. I was only able to get one of the freshies out of the cookie cutters and I can’t get the nail out of that one! What am I doing wrong? It looks so simple watching the videos.
Hi Sherry,
Are you removing them as soon as they’re done? If you wait until they are cool they are harder to remove. If that’s not the problem let us know and we’ll see what we can do 🙂
How many freshies can I get out of 16oz of aroma beads with 3 inch cookie cutters? I’m using a tooth shape.
Hi Sonia,
We work with large batches so we really can’t give an answer on using a specific amount. You’ll need to do a batch and see – sorry we couldn’t have been more help. 🙂
Tried everything to the T but the middle of alot of them are not baking correctly.
Hi Tony,
Can you give me a little more info? When you say not baking correctly, what do you mean? Maybe we can figure out what’s going on 🙂
Hi!!! So have you or is there a quicker way to makenthese like maybe a day or 2 at the most?
I would like to make them for an event this sat.
I have all supplies
Thanke for the inspiration
Hi Brandi,
The isn’t a quicker way that we know of -sorry we couldn’t have been more help 🙂
What makes the beads melt smooth? I lowered the oven temp but some of them still melted smooth.
Hi Jimmie,
Can’t say for sure but it does sound like they’re getting too hot. Ovens can sometimes run a little hot. I would suggest you make a small batch and experiment with your oven on lower temps. Since only some of them melted you may not have to lower too much more. Let us know 🙂
How long can the beads with oil be kept before baking them? Is there a set timeframe?
Hi Jami,
The beads can be kept about 3 months in a glass jar. Hope this helps 🙂
Do you have to use cookie cutters? Or could you heat them in a mold of some sort to be more of a 3D effect?
I don’t see why you couldn’t as long as the mold is oven safe. If you try it, let us know how it went (send some pictures) 🙂
How long do the freshies usually last when stored? Also what’s the best way to store them?
Hi Brianna, sorry for taking so long with your answer! The best way to store Freshies is in mason jars and they last several months 🙂
Can essential oils be used With coconut oil to make the aroma beads smell?
Hi Marcella,
I asked our Freshies person and she’s never tried coconut oil so isn’t sure if it will work or not. If you try it let us know how it turns out 🙂
I know this is a silly question but I thought I’d ask… when you say:
“ Fill cookie cutter 3/4 the way full and then pour into a bowl. Add mica powder color of choice. Mix till covered.“
How would I get the beads in the cookie cutter into a bowl? Is there a special way you do it?
Hi Christina
The easiest way to do it is put the cookie cutter on a small dish, fill it 3/4 of the way full then holding the cookie cutter down against the plate, pick the plate up and dump the beads into a bowl. Hope this helps 🙂
How do you clean your mason jars afterwards?
You can run them through the dishwasher. use our Homemade Dishwashing detergent with white vinegar https://consumerqueen.com/lifestyle/organic-natural-living/homemade-dishwashing-detergent
Are they flat on the baking side after trey cook ?mine are flat?
yes if they are on the baking sheet that side will be flat